Nissan Rogue Service Manual: Engine maintenance
DRIVE BELTS
DRIVE BELTS : Exploded View

- Generator pulley
- Water pump pulley
- Drive belt auto-tensioner
- Crankshaft pulley
- A/C compressor pulley
- Drive belt retainer boss
- View A
- New drive belt range
- Possible use range
- Indicator (notch)
DRIVE BELTS : Checking
WARNING: Inspect the drive belt only when the engine is stopped.
- Visually check entire drive belt for wear, damage or cracks.
- Check that the drive belt auto-tensioner indicator is within the possible use range.
NOTE:
- When new drive belt is installed, the drive belt auto-tensioner indicator should be within the new drive belt range.
- Check the drive belt auto-tensioner indicator when the engine is cold.
- If the drive belt auto-tensioner indicator is out of the possible use range or belt is damaged, replace drive belt.
DRIVE BELTS : Tension Adjustment
Belt tension is not manually adjustable. It is automatically adjusted by the drive belt auto-tensioner.
DRIVE BELTS : Removal and Installation
REMOVAL
- Remove wheel and tire (RH) using a power tool.
- Remove engine under cover. Refer to EXT-37, "ENGINE UNDER COVER : Removal and Installation"
- Remove fender protector side cover. Refer to EXT-28, "FENDER PROTECTOR : Exploded View".
- Securely hold the hexagonal part (A) of drive belt auto-tensioner (1) using suitable tool, and move in the direction of arrow (loosening direction of tensioner).
- Insert a rod approximately 6 mm (0.24 in) in diameter through
the rear of the drive belt auto-tensioner into retaining boss (B) to
lock drive belt auto-tensioner pulley.
WARNING: Avoid placing hand in a location where pinching may occur if the holding tool accidentally comes off.
NOTE: Leave drive belt auto-tensioner pulley arm locked until drive belt is installed again.
- Loosen drive belt from drive belt auto-tensioner and then remove it from the other pulleys.
- Installation of remaining components is in the reverse order of removal.

INSTALLATION
Installation is in the reverse order of removal.
- Install the drive belt onto all of the pulleys except for the drive belt auto-tensioner. Then install the drive belt onto drive belt auto-tensioner last.
CAUTION:
- Confirm belts are completely set on the pulleys.
- Check for engine oil and engine coolant. Be sure they are not adhered to the drive belt and each pulley groove.
- Release the drive belt auto-tensioner and apply tension to drive
belt.
WARNING: Avoid placing hand in a location where pinching may occur if the holding tool accidentally comes off.
- Turn crankshaft pulley clockwise several times to equalize tension between each pulley.
- Confirm the indicator is within the possible use range. Refer to MA-13, "DRIVE BELTS : Checking".
- Install wheel and tire (RH). Refer to WT-57, "Adjustment".
DRIVE BELTS : Removal and Installation of Drive Belt Auto-tensioner

- Drive belt auto-tensioner
REMOVAL
CAUTION: The complete drive belt auto-tensioner must be replaced as a unit, including the pulley.
- Remove the drive belt. Refer to MA-13, "DRIVE BELTS : Removal and Installation".
- Remove the drive belt auto-tensioner.
INSTALLATION
Installation is in the reverse order of removal.
CAUTION: Install the drive belt auto-tensioner carefully so not to damage the water pump pulley.
AIR CLEANER FILTER
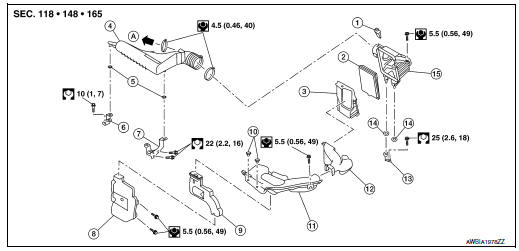
AIR CLEANER FILTER : Exploded View

- Mass air flow sensor
- Air cleaner filter
- Air cleaner case (lower)
- Air duct assembly
- Grommet
- Resonator bracket (front)
- Resonator bracket (rear)
- Resonator
- Air duct
- Mounting clip
- Air duct assembly
- Air duct assembly
- Air cleaner bracket
- Grommet
- Air cleaner case (upper)
- To Electric throttle control actuator
AIR CLEANER FILTER : Removal and Installation
CHANGING THE AIR CLEANER FILTER
- Remove air duct assembly from air cleaner case (upper).
- Open the air cleaner case.
- Remove the air cleaner filter.
- Install a new air cleaner filter.
- Close the air cleaner case.
- Secure the air cleaner case clips.
INSPECTION AFTER REMOVAL
Examine the air cleaner filter for stains, clogging, or damage.
- Remove dirt and foreign objects (such as dead leaves) on air cleaner filter surface and inside cleaner case.
- If clogging or damage is observed, replace the air cleaner filter.
CAUTION: Do not clean the viscous paper type air cleaner filter by blowing as there is a risk of deterioration of its performance.
MAINTENANCE INTERVAL
Refer to MA-7, "Introduction of Periodic Maintenance".
SPARK PLUG
SPARK PLUG : Exploded View

- Ignition coil
- Spark plug
- Rocker cover
SPARK PLUG : Removal and Installation
REMOVAL
- Remove air duct assembly.
- Remove ignition coil. Refer to EM-36, "Exploded View".
- Remove spark plug using Tool.
Tool number : — (J-48891)

INSPECTION AFTER REMOVAL
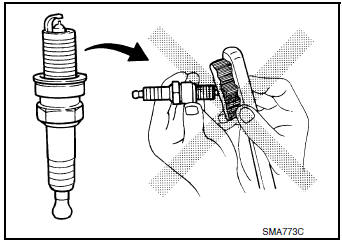
Visually check the electrode for dirt and wear and the insulator for burning.
(A) : Iridium alloy

- Do not use a wire brush for cleaning the spark plugs. Replace as necessary.

- If plug is covered with carbon, a spark plug cleaner may be used.
Cleaner air pressure : less than 588 kPa (6 kg/cm2, 85 psi)
Cleaning time : less than 20 seconds
- Checking and adjusting plug gap is not required between change
intervals. If the gap is out of specification, replace the spark plug.
CAUTION: Do not drop or shock plug.

INSTALLATION
Installation is in the reverse order of removal.

*: Always check with the Parts Department for the latest parts information.
ENGINE OIL
ENGINE OIL : Inspection
ENGINE OIL LEVEL
NOTE: Before starting engine, put vehicle horizontally and check the engine oil level. If engine is already started, stop it and allow 5 minutes before checking.
- Pull out oil level gauge and wipe it clean.
- Insert oil level gauge and check the engine oil level is within the range (A) as shown.
- If it is out of range, adjust it.

ENGINE OIL APPEARANCE
- Check engine oil for white milky appearance or excessive contamination.
- If engine oil becomes turbid and white, it is highly probable that
it is contaminated with engine coolant.
Repair or replace damaged parts.
ENGINE OIL LEAKS
Check for engine oil leaks around the following areas:
- Oil temperature sensor
- Oil level sensor
- Oil level gauge assembly O-ring.
- Crankshaft position sensor
- Camshaft position sensors
- Oil cooler
- Oil pan (upper and lower)
- Oil pan drain plug
- Oil pressure switch
- Oil filter
- Intake valve timing intermediate lock control solenoid valve
- Intake valve timing control solenoid valve
- Exhaust valve timing control solenoid valve
- Front cover
- Mating surface between cylinder head and camshaft bracket
- Mating surface between cylinder block and cylinder head
- Mating surface between cylinder head and rocker cover
- Crankshaft oil seals (front and rear)
OIL PRESSURE CHECK
WARNING:
- Be careful not to get burn yourself, as engine oil may be hot.
- When checking engine oil pressure, CVT shift lever should be in "P" position. Be sure to apply parking brake.
- Check the engine oil level.
- Remove fender protector side cover (RH). Refer to EXT-28, "FENDER PROTECTOR : Exploded View".
- Disconnect harness connector at oil pressure switch and remove oil
pressure switch using suitable tool.
CAUTION: Never drop or shock oil pressure switch.
- Install suitable tools (A/B).

- Start the engine and warm it up to normal operating temperature.
- Check the engine oil pressure with engine running under no-load.
NOTE:
- When engine oil temperature is low, engine oil pressure becomes high.
- If difference is extreme, check oil passage and oil pump for engine oil leaks.
Engine oil pressure : Refer to LU-17, "Oil Pressure".
- After the inspections, install oil pressure switch as follows:
- Remove old liquid gasket adhering to oil pressure switch and engine.
- Apply liquid gasket and tighten oil pressure switch to the specification.
Use Genuine RTV Silicone Sealant or equivalent. Refer to GI-22, "Recommended Chemical Products and Sealants".
Tightening torque : Refer to EM-92, "Exploded View".
- Check engine oil level.
- After warming up engine, check that there are no engine oil leaks with the engine running.
- Install fender protector side cover (RH). Refer to EXT-28, "FENDER PROTECTOR : Exploded View".
ENGINE OIL : Draining
WARNING:
- Be careful not to get burn yourself, as engine oil may be hot.
- Prolonged and repeated contact with used engine oil may cause skin cancer. Try to avoid direct skin contact with used engine oil. If skin contact is made, wash thoroughly with soap or hand cleaner as soon as possible.
- Warm up the engine, and check for engine oil leaks from engine components. Refer to MA-17, "ENGINE OIL : Inspection".
- Stop the engine and wait for 10 minutes.
- Loosen oil filler cap.
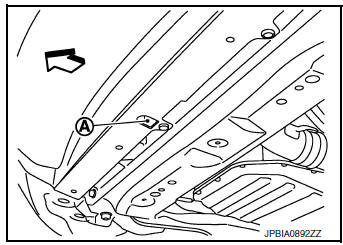
- Remove drain plug (1) and then drain engine oil.

 : Front
ENGINE OIL : Refilling
- Install drain plug with new drain plug washer. Refer to EM-32, "Exploded
View".
CAUTION: Be sure to clean drain plug and install with new drain plug washer.
Tightening torque : Refer to EM-32, "Exploded View".
- Refill with new engine oil.
Engine oil specification and viscosity: Refer to MA-11, "Engine Oil Recommendation".
Engine oil capacity : Refer to LU-17, "Oil Capacity".
CAUTION:
- The refill capacity depends on the engine oil temperature and drain time. Use these specifications for reference only.
- Always use oil level gauge to determine the proper amount of engine oil in engine.
- Warm up the engine and check area around drain plug and oil filter for engine oil leaks.
- Stop the engine and wait for 5 minutes.
- Check the engine oil level. Refer to MA-17, "ENGINE OIL : Inspection".
OIL FILTER
OIL FILTER : Removal and Installation
REMOVAL
- Remove fender protector side cover (RH). Refer to EXT-28, "FENDER PROTECTOR : Exploded View".
- Drain engine oil. Refer to MA-19, "ENGINE OIL : Draining".
- Remove oil filter using suitable tool (A)..

 : Front
WARNING: Be careful not to burn yourself, as engine oil may be hot.
CAUTION:
- When removing, prepare a shop cloth to absorb any engine oil leaks or spills.
- Do allow engine oil to adhere to drive belt.
- Completely wipe off any engine oil that adheres to engine and vehicle.
- Oil filter is provided with relief valve. Use genuine NISSAN oil filter or equivalent.

INSTALLATION
- Remove foreign materials adhering to oil filter installation surface.
- Apply new engine oil to the oil seal contact surface of new oil filter.

- Screw oil filter manually until it touches the installation surface, then tighten it by 2/3 turn (A). Or tighten to the specification.

Oil filter:
 : 17.7 N·m (1.8 kg-m, 13 ft-lb)
OIL FILTER : Inspection
INSPECTION AFTER INSTALLATION
- Check the engine oil level. Refer to MA-17, "ENGINE OIL : Inspection".
- Start the engine, and check that there is are no leaks of engine oil.
- Stop the engine and wait for at least 5 minutes.
- Check the engine oil level, and adjust the level (if necessary). Refer to MA-17, "ENGINE OIL : Inspection".
ENGINE COOLANT
ENGINE COOLANT : Inspection
LEVEL
- Check that the reservoir tank engine coolant level is within the “MIN” to “MAX” when the engine is cool.

(A) : MAX
(B) : MIN
- Adjust the engine coolant level if necessary.
CAUTION: Refill Genuine NISSAN Long Life Antifreeze/Coolant (blue) or equivalent in its quality mixed with water (distilled or demineralized).
Refer to MA-11, "Fluids and Lubricants".
CHECKING COOLING SYSTEM FOR LEAKS
- To check for leaks, apply pressure to the cooling system using suitable tools (A/B).

Testing pressure : Refer to CO-25, "Radiator".
WARNING: Do not remove the radiator cap when the engine is hot. Serious burns could occur from high-pressure engine coolant escaping from the radiator. Wrap a thick cloth around the cap.
Slowly push down and turn it a quarter turn to allow built-up pressure to escape. Carefully remove the cap by pushing it down and turning it all the way.
CAUTION:
- Perform this step when the engine is cold.
- Do not spill engine coolant on drivebelt.
- Higher test pressure than specified may cause radiator damage.
NOTE:
- If engine coolant decreases, replenish radiator with engine coolant. Refer to MA-11, "Fluids and Lubricants".
- If anything is found, repair or replace damaged parts.
ENGINE COOLANT : Draining
WARNING: Do not remove radiator cap when engine is hot. Serious burns could occur from high pressure engine coolant escaping the radiator. Wrap a thick cloth around the cap. Slowly push down and turn it a quarter turn to allow built-up pressure to escape. Carefully remove the cap by pushing it down and turning it all the way.
- Open radiator drain plug at the bottom of radiator, and then remove radiator cap.

(A) : Radiator drain plug hole
 : Vehicle front
CAUTION:
- Do not allow engine coolant to contact the drive belt.
- Perform this step when the engine is cold.
- Follow this step for heater core removal/replacement only. Disconnect the upper heater hose at the engine side and apply moderate air pressure [103.46 kPa (1.055 kg/cm2, 15 psi) maximum air pressure] into the hose for 30 seconds to blow the excess engine coolant out of the heater core.
- When draining all of the engine coolant in the system, remove the reservoir tank and drain the engine coolant, then clean the reservoir tank before installation.
CAUTION:
- • Do not allow the engine coolant to contact the drive belt.
- Perform this step when engine is cold.
- When draining all of the engine coolant in the system for engine removal or repair, remove the engine coolant drain plugs (A/B) from the cylinder block.

- Check the drained engine coolant for contaminants such as rust,
corrosion or discoloration.
If the engine coolant is contaminated, flush the engine cooling system. Refer to MA-24, "ENGINE COOLANT : Flushing".
ENGINE COOLANT : Refilling
CAUTION:
- Do not put additive such as waterleak preventive, since it may cause cooling waterway clogging.
- When refilling use Genuine NISSAN Long Life Antifreeze/Coolant (blue) or equivalent in its quality mixed with water (distilled or demineralized). Refer to MA-11, "Fluids and Lubricants".
- Install the radiator drain plug. Install the reservoir tank and cylinder block drain plug, if removed for a total system drain or for engine removal or repair.
- The radiator must be completely empty of coolant and water.
- Apply sealant to the threads of the cylinder block drain plug.
- Use recommended coolant or equivalent.
Refer to MA-11, "Fluids and Lubricants".

Radiator drain plug : Refer to CO-13, "Exploded View".
Cylinder block drain plug (A) : 53.9 Nm (5.5 kg-m, 40 ft-lb)
Cylinder block drain plug (B) : 9.8 N·m (1.0 kg-m, 87 in-lb)
- If disconnected, reattach the upper radiator hose at the engine side.
- Set the vehicle heater controls to the full HOT and heater ON position. Turn the vehicle ignition ON with the engine OFF as necessary to activate the heater mode.
- Install the Tool by installing the radiator cap adapter onto the radiator neck opening. Then attach the gauge body assembly with the refill tube and the venturi assembly to the radiator cap adapter.
Tool number : KV991J0070 (J-45695)
- Insert the refill hose into the coolant mixture container that is placed at floor level. Make sure the ball valve is in the closed position.
- Use recommended coolant or equivalent.
Refer to MA-11, "Fluids and Lubricants".
Engine coolant capacity (with reservoir tank) : Refer to CO-25, "Periodical Maintenance Specification".
CAUTION: Do not use any cooling system additives such as radiator sealer. Additives may clog the cooling system and cause damage to the engine, transmission and/or cooling system.
- Install an air hose to the venturi assembly, the air pressure must be within specification.

Compressed air supply pressure : 549 - 824 kPa (5.6 - 8.4 kg/cm2, 80 - 119 psi)
CAUTION: The compressed air supply must be equipped with an air dryer.
- The vacuum gauge will begin to rise and there will be an audible hissing noise. During this process open the ball valve on the refill hose slightly. Coolant will be visible rising in the refill hose. Once the refill hose is full of coolant, close the ball valve. This will purge any air trapped in the refill hose.
- Continue to draw the vacuum until the gauge reaches 28 inches of vacuum. The gauge may not reach 28 inches in high altitude locations, use the vacuum specifications based on the altitude above sea level.

Altitude above sea level Vacuum gauge reading
0 - 100 m (328 ft) : 28 inches of vacuum
300 m (984 ft) : 27 inches of vacuum
500 m (1,641 ft) : 26 inches of vacuum
1,000 m (3,281 ft) : 24 - 25 inches of vacuum
- When the vacuum gauge has reached the specified amount, disconnect the air hose and wait 20 seconds to see if the system loses any vacuum. If the vacuum level drops, perform any necessary repairs to the system and repeat steps 6 - 8 to bring the vacuum to the specified amount. Recheck for any leaks.
- Place the coolant container (with the refill hose inserted) at the
same level as the top of the radiator. Then
open the ball valve on the refill hose so the coolant will be drawn up to
fill the cooling system. The cooling
system is full when the vacuum gauge reads zero.
CAUTION: Do not allow the coolant container to get too low when filling, to avoid air from being drawn into the cooling system.
- Remove the Tool from the radiator neck opening.
- Fill the cooling system reservoir tank to the specified level and install the radiator cap. Run the engine to warm up the cooling system and top up the system as necessary.
ENGINE COOLANT : Flushing
- Install reservoir tank, if removed, and radiator drain plug.
CAUTION:
- Be sure to clean drain plug.
- Do not reuse O-ring.
Radiator drain plug : Refer to CO-13, "Exploded View".
- If water drain plugs on cylinder block are removed, close and tighten them. Refer to EM-92, "Exploded View".
- Run the engine and warm it up to normal operating temperature.
- Rev the engine two or three times under no-load.
- Stop the engine and wait until it cools down.
- Drain water from the system. Refer to MA-21, "ENGINE COOLANT : Draining".
- Repeat steps 1 through 5 until clear water begins to drain from radiator.
RADIATOR CAP
RADIATOR CAP : Inspection
CHECKING RADIATOR CAP
- Inspect the radiator cap.
- Replace the cap if the metal plunger cannot be seen around the edge of the black rubber gasket.
- Replace the cap if deposits of waxy residue or other foreign material are on the black rubber gasket or the metal retainer.
NOTE: Thoroughly wipe out the radiator filler neck to remove any waxy residue or foreign material.
- Pull the negative-pressure valve to open it and check that it closes completely when released.
- Check that there is no dirt or damage on the valve seat of the radiator cap negative-pressure valve.
- Check that there are no abnormalities in the opening and closing conditions of the negative-pressure valve.

- Check radiator cap relief pressure using suitable tool (A/B).
Standard : Refer to CO-25, "Radiator".
- Apply water or engine coolant to the cap seal surface before connecting the radiator cap to the tester.
- Replace the radiator cap if there is an abnormality in the negative- pressure valve, or if the open-valve pressure is outside of the standard values.

RADIATOR
RADIATOR : Inspection
Check radiator for mud or clogging. If necessary, clean radiator as follows.
CAUTION:
- Be careful not to bend or damage radiator fins.
- When radiator is cleaned without removal, remove all surrounding parts such as radiator cooling fan assembly and horns. Then tape harness and harness connectors to prevent water from entering.
- Spray water to the back side of the radiator core using a side to side motion from the top down.
- Stop spraying when debris no longer flows from radiator core.
- Blow air into the back side of radiator core using a side to side motion from the top down.
- Use compressed air lower than 490 kPa (5 kg/cm2, 71 psi) and keep distance more than 30 cm (11.8 in).
- Continue to blow air until no water sprays out.
- Check for engine coolant leaks. Repair as necessary.
FUEL LINES
FUEL LINES : Inspection
Inspect fuel lines, fuel filler cap, and fuel tank for improper attachment, leaks, cracks, damage, loose connections, chafing or deterioration.

(A) : Engine
(B) : Fuel line
(C) : Fuel tank
If necessary, repair or replace damaged parts.
EVAP VAPOR LINES
EVAP VAPOR LINES : Inspection
CAUTION:
- Do not use compressed air or a high pressure pump.
- Do not exceed 4.12 kPa (0.042 kg/cm2, 0.6 psi) of pressure in EVAP system.
NOTE:
- Do not start engine.
- Improper installation of EVAP service port adapter [commercial service tool: (J-41413-OBD)] to the EVAP service port may cause a leak.
1.EVAP LEAK CHECK
 With CONSULT
- Install EVAP service port adapter [commercial service tool: (J- 41413-OBD)] and pressure pump to EVAP service port.

- Turn ignition switch ON.
- Select the “EVAP SYSTEM CLOSE” in “WORK SUPPORT” mode of “ENGINE” using CONSULT.
- Touch “START”. A bar graph (Pressure indicating display) will appear on the screen.
- Apply positive pressure to the EVAP system until the pressure indicator reaches the middle of the bar graph.
- Remove EVAP service port adapter [commercial service tool: (J-41413-OBD)] and hose with pressure pump.
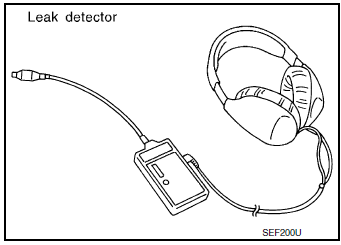
- Locate the leak using a leak detector [commercial service tool: (J-41416)]. Refer to EC-53, "EVAPORATIVE EMISSION SYSTEM : System Description".

 Without CONSULT
- Install EVAP service port adapter [commercial service tool: (J- 41413-OBD)] and pressure pump to EVAP service port.

- Apply battery voltage between the terminals of EVAP canister vent control valve to make a closed EVAP system.
- To locate the leak, deliver positive pressure to the EVAP system until pressure gauge points reach 1.38 to 2.76 kPa (0.014 to 0.028 kg/cm2, 0.2 to 0.4 psi).
- Remove EVAP service port adapter [commercial service tool: (J-41413-OBD)] and hose with pressure pump.
- Locate the leak using a leak detector [commercial service tool: (J-41416)]. Refer to EC-53, "EVAPORATIVE EMISSION SYSTEM : System Description".

>> INSPECTION END
 Recommended fluids and lubricants
Fluids and Lubricants
*1: For additional information, see “Engine Oil Recommendation”.
*2: As an alternative to this recommended oil, SAE 5W-30 conventional petroleum
based oil may be us ...
 Chassis maintenance
EXHAUST SYSTEM
EXHAUST SYSTEM : Inspection
Check exhaust pipes, muffler, and mounting for improper attachment,
leakage, cracks, damage or deterioration.
If anything is found, repair or re ...
Other materials:
Steering column
Inspection
HOLE COVER SEAL, HOLE COVER AND LOWER SHAFT
Check each part of hole cover seal, hole cover and steering column and lower
shaft for damage or other malfunctions.
Replace if necessary.
STEERING COLUMN
Check each part of steering column for damage or other
malfunctions. ...
Precaution
Precaution for Supplemental Restraint System (SRS) "AIR BAG" and "SEAT
BELT
PRE-TENSIONER"
The Supplemental Restraint System such as “AIR BAG” and “SEAT BELT PRE-TENSIONER”,
used along
with a front seat belt, helps to reduce the risk or severity of injury to the
...
Moonroof motor assembly
Exploded View
Panoramic roof glass
Glass lid
Side trim covers (LH/RH)
Front drain hose front (LH/RH)
Moonroof motor assembly
Sunshade motor assembly
Moonroof front bracket (LH/RH)
Moonroof rear bracket (LH/RH)
Drain hose rear (LH/RH)
Moonroof unit assembly ...
