Nissan Rogue Service Manual: Front bumper
Exploded View

- Front bumper fascia side bracket (RH)
- Front bumper reinforcement support (RH)
- Front bumper reinforcement
- Front energy absorber
- Front lower grille
- Front fog lamp (RH) (if equipped)
- Front bumper fascia
- Front bumper fascia finisher (RH) (if equipped)
- Front fog lamp finisher (RH) (if equipped)
- Front license plate bracket
- Front air spoiler
- Tow cover
- Front fog lamp finisher (LH) (if equipped)
- Front bumper fascia finisher (LH) (if equipped)
- Front fog lamp (LH) (if equipped)
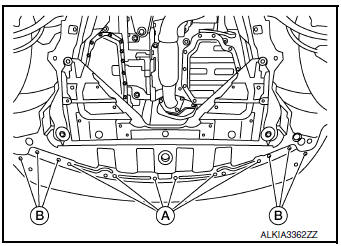
- Front under cover
- Front bumper reinforcement support (LH)
- Front bumper fascia side bracket (LH)
Removal and Installation
REMOVAL
CAUTION: Bumper fascia is made of resin. Use care when handling to prevent damage. Avoid contact with oily substances.
- Remove front grille. Refer to EXT-23, "Removal and Installation".
- Remove front bumper fascia clips (A).

- Remove front bumper fascia clips (A) and screws (B).
- Partially remove front fender protectors (LH/RH). Refer to EXT-28, "FENDER PROTECTOR : Exploded View".
- Partially remove front over fender molding. Refer to EXT-30, "FRONT OVER FENDER : Removal and Installation".
- Remove front bumper fascia screws (A) (LH/RH).
(1): Front bumper fascia
(2): Front over fender molding

- Disconnect fog lamp harness connectors (LH/RH) (if equipped).
- Release front bumper fascia pawls from front bumper fascia side brackets (LH/RH) and remove.
CAUTION: When removing front bumper fascia, two people are required to avoid damaging.
- Remove front bumper fascia bolts (A) and the front bumper side bracket (1) (LH/RH) (if necessary).

- Remove intelligent key warning buzzer. Refer to DLK-273, "Removal and Installation".
- Release harness connector clips from bumper reinforcement, then remove bumper reinforcement nuts (A) and bumper reinforcement (1) (LH/RH).

- Remove front bumper reinforcement support bolts (A) and front bumper reinforcement supports (1) (LH/RH).

- Remove the following parts (if necessary) after removing front bumper fascia assembly.
- Front fog lamps (if equipped). Refer to EXL-121, "Removal and Installation".
- Front fog lamp finishers
- Front fascia grille
- Front license plate bracket
INSTALLATION
Installation in the reverse order of removal.
- The following table shows the specified values for checking normal installation status.
- Fitting adjustment cannot be performed.


 Rear bumper
Exploded View
Rear bumper fascia side bracket
(LH)
Rear mud protector
Rear bumper reinforcement support
(LH)
Rear bumper fascia undercover
(LH)
Rear bumper reinforcement
...
Other materials:
Precaution
PRECAUTIONS
Precaution for Supplemental Restraint System (SRS) "AIR BAG" and "SEAT
BELT
PRE-TENSIONER"
The Supplemental Restraint System such as “AIR BAG” and “SEAT BELT PRE-TENSIONER”,
used along
with a front seat belt, helps to reduce the risk or severity of inj ...
Moonroof unit assembly
Inspection
WIND DEFLECTOR
Open glass lid fully.
Visually check for proper installation, damaged/deteriorated components,
or foreign objects within mechanism.
Correct as required for smooth operation.
Check for grease at the wind deflector arm (1) and pivot areas. If
necessary, apply ...
ABS actuator and electric unit (control unit)
Exploded View
ABS actuator and electric unit (control unit)
Connector
Bracket
To front LH brake caliper
To rear RH brake caliper
From master cylinder secondary side
From master cylinder primary side
To rear LH brake caliper
To front RH brake ...
